
If you’re a diecast model enthusiast or a fan of the iconic Ghostbusters franchise, customizing your diecast police car with a Ghostbusters siren LED could be an exciting project. A diecast car is more than just a model; it’s a piece of art that can be personalized to showcase your passion for Ghostbusters and other unique features. Adding a Ghostbusters siren LED transforms a simple diecast car into a one-of-a-kind piece that stands out in any collection. Whether you want to create a realistic homage to the Ecto-1 or just incorporate a bit of Ghostbusters flair into your diecast collection, this guide will walk you through the step-by-step process of customization.
Why Customize Your Diecast Police Car With A Ghostbusters Siren LED?
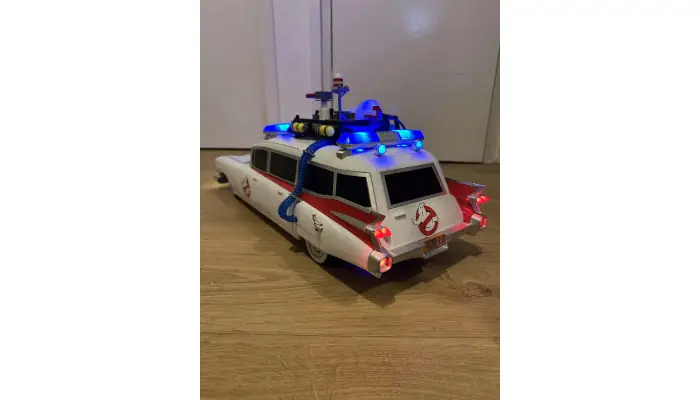
Customizing your diecast car with a Ghostbusters siren LED offers multiple benefits. First, it adds an authentic touch to your model, especially if you are attempting to replicate the legendary Ecto-1 vehicle from Ghostbusters. The siren LED provides a visual and auditory experience, offering a dynamic upgrade to the static nature of diecast models. The pulsating blue and red lights paired with the siren sound create an immersive and lifelike effect, enhancing the overall realism of your model.
Secondly, the addition of a siren LED is an exciting way to celebrate your love for Ghostbusters. The franchise has a massive cult following, and including an iconic feature like the Ghostbusters siren can help your diecast car stand out in a collection. Additionally, it brings the nostalgia and charm of the 1980s movie to life, offering fans a chance to interact with a part of the Ghostbusters universe.
What You’ll Need To Customize Your Diecast Police Car?
Before you begin customizing your diecast police car with a Ghostbusters siren LED, there are several tools and components you’ll need:
- Diecast Police Car Model: Choose a diecast police car that suits your style or one that closely resembles the Ecto-1 from Ghostbusters. You can find diecast models from various manufacturers, including Hot Wheels, Matchbox, and other specialized companies.
- Ghostbusters Siren LED Kit: To add the siren and LED lighting to your diecast car, you will need a compatible Ghostbusters siren LED kit. These kits usually contain LED lights, sound modules, wiring, and the components needed to install the lights and sound into the vehicle.
- Soldering Kit: You may need a soldering iron to connect the LED wires and sound components to the car’s circuit. A soldering kit typically includes a soldering iron, solder, and other tools necessary for making electrical connections.
- Miniature Speaker: To complete the siren effect, you’ll need a tiny speaker that can fit inside the diecast car model. It’s best to choose a speaker with a compact size that won’t take up too much space in your car model.
- Wires and Connectors: Ensure you have the right wiring and connectors to safely attach the LED lights and sound module to the power source. This might involve using small connectors to avoid damage to the delicate parts of the diecast model.
- Hot Glue Gun: This tool is essential for securing components like the LED lights and speaker inside the car model without causing any damage to the body of the diecast car.
- Tools for Dismantling: You’ll likely need small screwdrivers or plastic pry tools to remove the body of the diecast car and access the areas where you’ll install the LED lights and sound module.
Step-By-Step Guide To Customizing Your Diecast Police Car
Once you have all the necessary tools and components, it’s time to begin customizing your diecast police car with the Ghostbusters siren LED.
Prepare The Diecast Car
The first step in the customization process is to prepare the diecast car. Use small screwdrivers or plastic pry tools to carefully open the car’s body. Many diecast models are designed to be taken apart, but it’s important to handle the car gently to avoid damaging the paint or small details. You might need to remove the bottom screws or pry off a few plastic tabs to detach the top portion of the car.
Plan Your Siren And LED Placement
Before you begin installing the LEDs and siren module, decide where you want to place them inside the car. Ideally, you want the LEDs to be placed near the front of the vehicle, mimicking the placement of the siren on the Ecto-1 or other emergency vehicles. It’s important to choose locations that will allow the LEDs to be visible through the car’s windows or light openings.
The miniature speaker will need to be positioned in a location that can produce sound clearly, typically in the back of the car or within an empty compartment. Make sure the sound module and speaker will fit comfortably inside without obstructing any moving parts or visible features of the diecast model.
Install The LED Lights
Once you’ve mapped out where the LEDs will go, it’s time to install them. Carefully position the LED lights inside the car body. You may need to use a hot glue gun to secure the LEDs in place. Be cautious not to glue the lights directly to the car’s paint to avoid any accidental damage.
Use a small amount of glue and press the LEDs firmly into place. If your LED kit includes multiple lights, you may want to place them on both the front and rear of the vehicle for the full siren effect.
Wire The LEDs And Speaker
Once the LED lights are securely in place, you can start wiring them to the sound module and speaker. This step can require some precision, so it’s important to carefully follow the instructions that come with your LED kit.
Use a soldering iron to connect the wires to the power source or battery pack. The sound module will be wired to the speaker, and the LED lights will be connected to the control circuit. Ensure all connections are secure and insulated to avoid short circuits. If your kit includes connectors, use them to easily attach and detach wires as needed.
Attach The Sound Module And Speaker
Once the LED lights are wired, it’s time to install the sound module and speaker. Use the hot glue gun to affix the speaker and sound module to the inside of the car. Position the speaker near an opening or grille in the car to ensure the sound can escape clearly.
The sound module is usually powered by a small battery, which can be hidden under the car’s chassis or in another discreet location. Make sure the module is positioned in a way that allows easy access for battery replacement if necessary.
Test The Lights And Siren
Before reassembling the car, it’s a good idea to test the lights and siren to ensure everything is working correctly. Turn on the power and check if the LEDs are illuminating the front of the vehicle and the siren sound is working. If the lights or sound are not functioning properly, recheck your connections and ensure everything is securely in place.
Reassemble The Diecast Car
Once you’re satisfied with the installation of the LEDs and sound module, carefully reassemble your diecast police car. Make sure all the screws are tightened and that the components inside are properly secured. Be gentle to avoid any damage to the newly instalLED electronics.
Conclusion
Customizing your diecast police car with a Ghostbusters siren LED is an exciting and rewarding project for fans of the Ghostbusters franchise and model enthusiasts alike. By following these simple steps and using the right tools and components, you can transform your diecast car into a spectacular piece that lights up and sounds just like the iconic Ghostbusters siren. Whether you’re replicating the Ecto-1 or adding a Ghostbusters twist to your own vehicle, this customization will surely make your diecast collection stand out. Not only will your car come to life with flashing lights and siren sounds, but you’ll also create a memorable homage to one of the most beloved films of all time.
Resources URL:
https://en.wikipedia.org/wiki/Ghostbusters
https://evandesigns.com/products/ghostbusters-ecto-siren

Audrey Shafer is a seasoned writer specializing in the dynamic world of business. With a keen analytical mind and a passion for entrepreneurship, Audrey delves into diverse topics ranging from startups to corporate strategy.